

If you managed to make it this far in life without knowing what all those little markings mean on a tape measure or ruler, never fear. We have the article for you. At the Museum where I work, I used to train college interns to hang art. Out of over two dozen, only two could read a tape measure. Evidently, schools don’t teach this precious skill. Read on to learn everything you need to know about how to read a tape measure and ruler. This includes understanding both metric and imperial (fractions) measurements.

The Hook
First, let’s start with a critical fact about the tape measure. Yes, the hook on the tape measure is supposed to slide back and forth. When you measure an inside measurement, it shrinks the exact thickness of the tape measure’s hook. When you measure an outside measurement, it expands the precise thickness of the hook. This way, 0” is always at 0”.
Know the Size of Your Tape Measure Housing
Second, most tape measure housings are 3-inches. Knowing this means that when you measure an inside measurement, you can hold the tape measure as shown in the photo. Read the tape measure at the spot shown. Now add exactly 3-inches to get the correct measurement.

How to Read a Metric Tape Measure
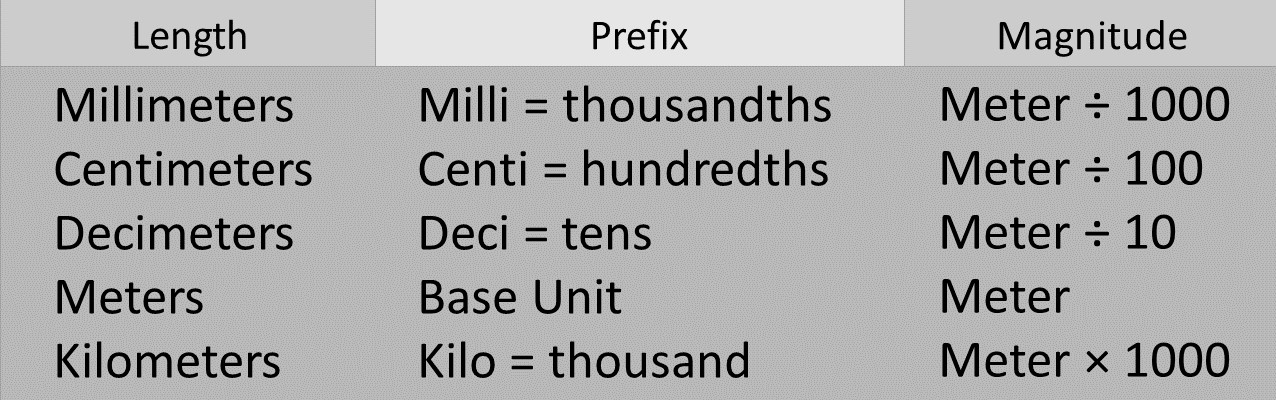
Now let’s get to it. We will start with the metric system since that is slightly easier. The metric system is based on the meter. A meter is about 3.28 feet or 1.09 yards. If we divide a meter by ten, we get decimeters. Each decimeter is 3.94-inches. My metric tape measures highlight these in red. Only they are not written as 1, 2, 3, 4, decimeters on the tape measures. No one really uses decimeters to speak of. Centimeters are much more universal.
Divide a meter into 100, and you get centimeters. When you look at a metric tape measure or ruler, you will see the entire length is in centimeters. I have an 8-meter tape measure (~26 feet), and the only measurement written on it is centimeters- from 1 to 800. Every 10 centimeters (decimeters) is red.

If you divide a meter into 1000, you get millimeters. Those are the smallest hash marks on the metric ruler or tape measure. There are ten hash marks between every centimeter, with the fifth one being slightly larger for easier identification.
Last, multiply a meter times 1000 equals a kilometer which is 0.621 miles.
How to Read Imperial Tape Measures
The Imperial system is not nearly as complicated as other countries would have you believe. The metric system is ten based, and the imperial system divides by two. Having been a photography teacher for a decade, I know not to take people’s essential knowledge for granted. Since Pro Tool Reviews cover a worldwide audience, not everyone has grown up with imperial measurements. So that we are all on the same page:
- A yard is divided into three feet.
- A foot is divided into twelve inches.
- There are thirty-six inches in a yard.
Editor’s Note: We can express inches by the ” symbol. So 12-inches and 12″ mean the same thing.
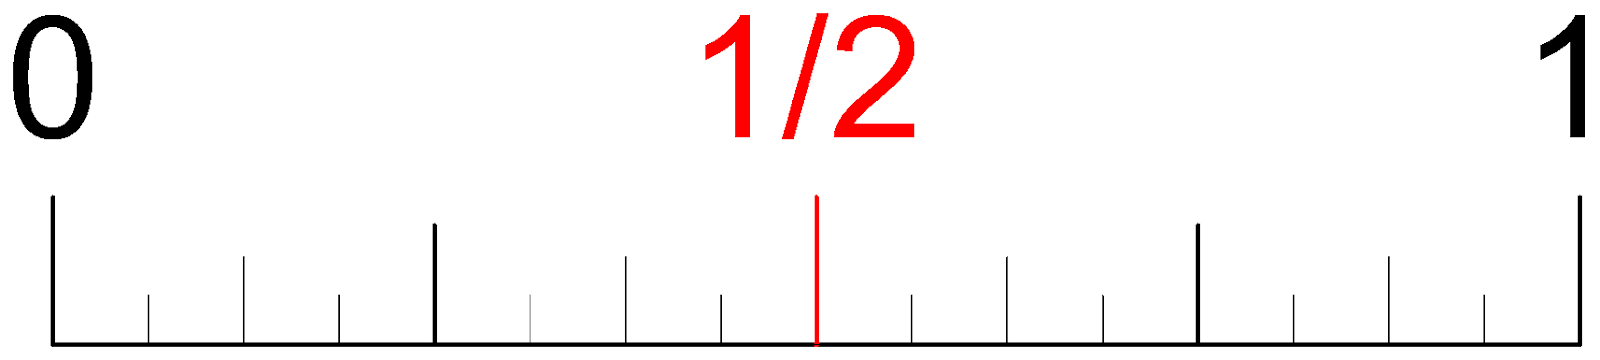
Now, let’s take a close look at the hashes between the inch marks. Note the drawing below is not to scale. Here we are starting with 1-inch. If we divide 1-inch by 2, we get 1/2-inch. There are two 1/2 inches in one inch. When we look at the drawing below, you will see the half-inch mark highlighted. On either side of it is one of the half inches that makes up the one full inch.
If we divide 1/2-inch in half again, we get 1/4”. There are four of those in one inch. In the drawing below, I have highlighted the 1/4-inch mark. The 1” marks are the largest hash marks on the tape measure or ruler. The half-inch marks are the second largest. The one quarter is the next largest and so on, each getting progressively smaller.

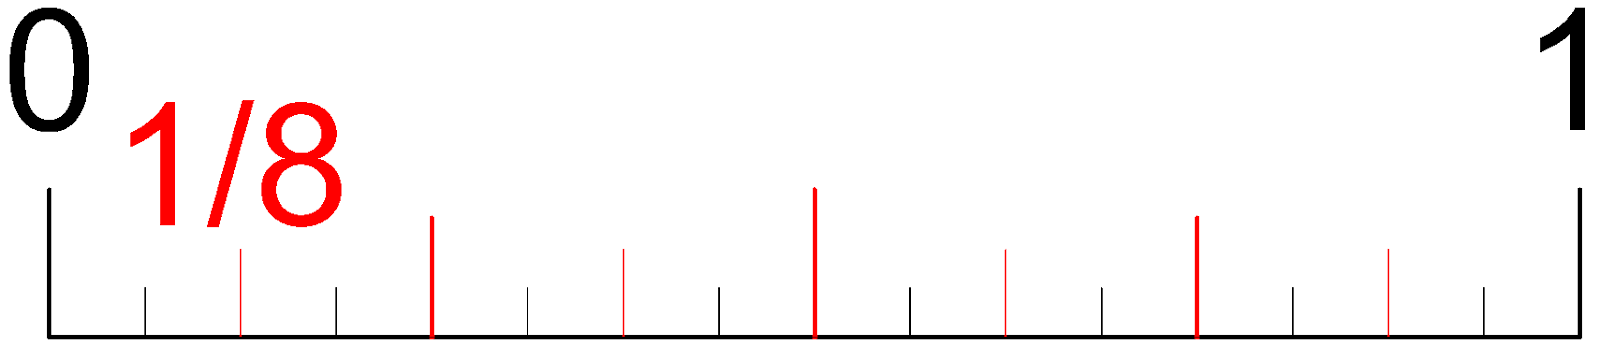
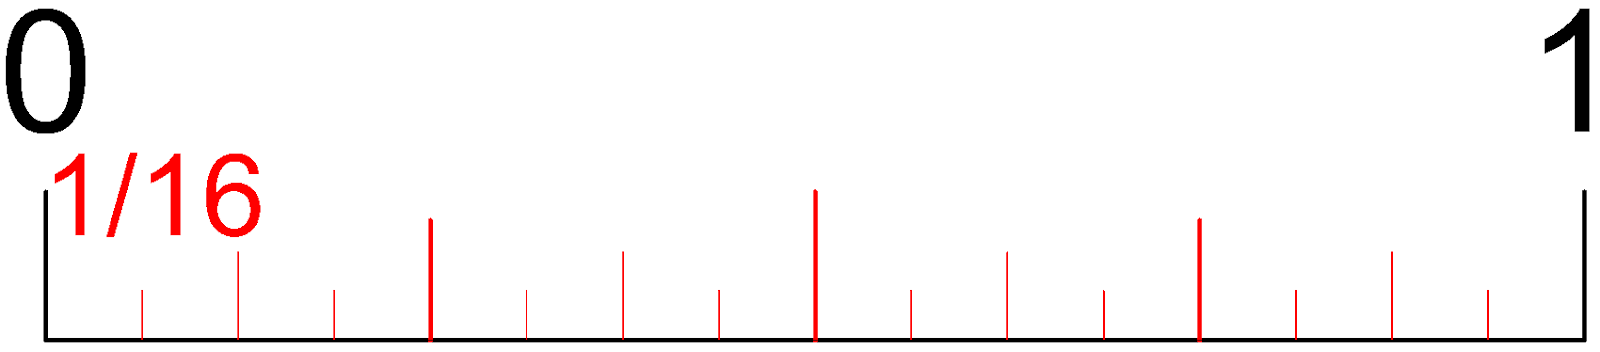
When we divide 1/4” in half, we get 1/8”. There are, you guessed it, eight of those in one inch. Lastly comes 1/16”. That is about as small as you will find across the entire scale on even the best tape measure.
Some specialty tape measures include 1/32” and even 1/64” on the first 3-inches of the tape measure when you need to be really accurate.
16-inch Red Numbers and Black Diamonds on Tapes
Now that you know how to read a tape measure, you might be asking, why are 16-inch increments red. You also may want to understand the purpose of those tiny black diamonds at 19.2-inches? Believe it or not, they actually work together.
When laying out stud walls, you typically have two options according to building codes. Most interior walls place a stud every 16-inches. Smaller structures can place studs every 24-inches. You also see 24-inch on-center spacing for standard roofing trusses.
If you take an 8-foot span and start placing studs on it at 16-inches on center, you get maximum strength for your walls. Here, you will use seven studs over the 8-foot span. This costs the most money. 24-inch centers cost the least amount of money (using only five studs) and have the least strength. These are used chiefly for roof truss spacing, garden sheds, and some interior non-load-bearing walls.
If we split the difference and use six studs over 8-feet, the math works out to be precisely 19.2-inches on center. This is where we use the black diamonds. They locate the studs for you if you are using this wider spacing (if building codes allow for it, of course.) So, to summarize:
- 16-inches on-center = 7 studs
- 19.2-inches on-center = 6 studs
- 24-inches on-center = 5 studs
Conclusion
These are the basics of how to read a tape measure. We have an article full of woodworking measuring and marking tips and tricks using a tape measure.